Tuesday, December 15, 2015

Always run Windows command prompt as administrator

If I'm using command prompt on a Windows machine, there is a 99% chance that whatever I'm using it for needs to be run as administrator. Which frustrates me, since I need to right click the program each time and run it specially as an administrator. So instead, here's how to fix that on a 2012r2 machine. It will still prompt for UAC, unless you shut UAC off completely, but I would never do that.

Search for cmd, right click it, and click "Open file location"
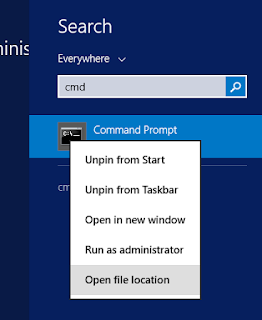

Mine already took me to the shortcut version. So, right click it, click Properties, click the Shortcut tab, click Advanced in the lower right, and then check the box "Run as administrator". Click Ok, Apply. Now just toss that shortcut wherever you want, and it'll always run as administrator when you use it. I right click mine and put it in the taskbar, for quick access.
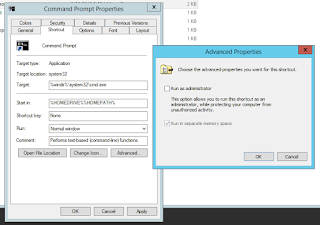
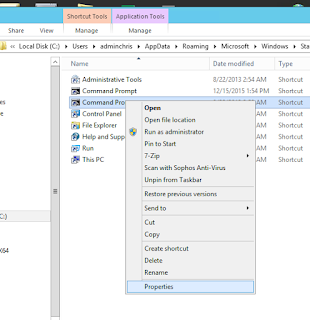

If yours doesn't take you to a shortcut version, it might take you right to the actual file in C:\Windows\system32. In that case, right click the file, and click Create Shortcut. It will prompt you to put the shortcut on your desktop. Click yes. When you find the shortcut on your desktop, simply follow the steps from above.


OS X 10.11 - Corrupted MAC on input.

If you frequently SSH into network management devices, such as routers and switches, you may notice that in 10.11, it doesn't work anymore. The error message received is: Corrupted MAC on input. ssh_packet_read: message authentication code incorrect.

To get around this, you just need to edit your ssh_config. I'll use nano in this example. 

In terminal, issue:       sudo nano /etc/ssh/ssh_config

Enter your password and hit enter

Scroll down until you see this line: 
#   MACs hmac-md5,hmac-sha1,umac-64@openssh.com,hmac-ripemd160

Delete the pound sign, which will un-comment that line and make it active.

Hold Control and hit X to exit, hit Y to save, and Enter to apply. 

That should do it!


Wednesday, June 10, 2015

OS X 10.11 El Capitan - Flush DNS

On OS X 10.11 El Capitan, flushing DNS uses the same commands as 10.9 and previous. If you've seen the news, the last 10.10.4 betas showed that Apple has removed discoveryd and discoveryutil.


To flush your DNS on OS X 10.11, issue this command in terminal:

sudo dscacheutil -flushcache;sudo killall -HUP mDNSResponder;say flushed 


Friday, June 5, 2015

OS X 10.10.4 Yosemite - Flush DNS

I didn't realize this until now, but it looks like with Apple's removal of 'discoveryd' in the newest beta, 'discoveryutil' is also gone from the command line. To flush the DNS cache, we now need to revert back to the commands from 10.9 Mavericks.

I only noticed when clearing my cache suddenly resulted in "discoveryutil: command not found" errors when running "sudo discoveryutil mdnsflushcache". Looks like it's not my system acting up, since it carries across reboot.

For reference, the current command to use in the new 10.10.4 betas, and presumably moving forward, is:

sudo dscacheutil -flushcache;sudo killall -HUP mDNSResponder;say flushed